Saturday, June 27, 2009

Invisible Zipper

Finally, the sewing goddess has granted me a success. I was leary of trying an invisible zipper because there are many people who have trouble with it. Of course, others consider it a simple task. It was time for me to just do it. For the first time, I think it turned out well. I didn't even have to pull out my seam ripper. I know there were no seams to match so I don't want to get too cocky. Now, I believe it is as easy as any other zipper and the results look so much more professional.


For instructions, I used a combination of the tutorial from Els and the instructions in Bernina's Features Book. I have the Bernina invisible zipper foot #35 and wanted to use it. With the foot, it is not necessary to press the coils. For these instructions to work, the zipper has to be at least one inch longer than the opening. My zipper was just a little over 1 inch longer. I started pretty much like a centered zipper: stabilized the zipper opening, sewed up to the zipper opening point and basted the zipper opening. After pressing the seam open, I removed the basting. Thank you, Els, for this info which helped me a lot. My pressing showed me exactly where the zipper needed to be stitched. The zipper coil is placed precisely at the pressed fold. I pinned the right side of the zipper (Bernina does right side first, Els does left side first), checked it was in the right place, basted it, and sewed from the top to the end of the opening. Like Els, I sewed a diagonal line at the end rather than backstitching. Then I closed the zipper (just my approach), pinned it in place, opened the zipper, checked the left coil was on the fold, and basted it. I didn't backstitch when I started sewing the left side as I fully expected to have to rip it! Naturally, I was prepared so it went in just fine. I pulled the zipper pull up near the end of the opening (just a peek so it didn't get in the way of the foot). After sewing to the end of the opening, I pulled the top thread to the back and did a few back stitches by hand. I did not cut off the end of the zipper - doesn't seem to be a problem. If it is, I always can cut it off and bar tack the end. Sorry, I didn't take pictures as I was constructing this. I was focused and wasn't sure that it would work. Here's a picture of the inside of the finished zipper:
The skirt is finished now except for the final pressing. Once I do that, I'll post about the skirt construction.

Friday, June 26, 2009

NL6163: Kindergarten Lessons

Although I finished this top over a week ago, I debated about doing this post. I've decided that I need to record my experience with this shell for myself anyway. I doubt it, but I may just warn somebody else. Here's the top:


Here's the back view:


I think that this is an o.k top. Certainly the fit needs some tweeks. I could have had a fabulous blouse. Here I thought that I was ready for the 3rd grade in my sewing education and I forgot some basics from kindergarten.
1. Listen to the fabric. I originally planned this fabric for another blouse. As hard I tried, I couldn't fit the pattern pieces on this piece of fabric. So, What did I say: Fabric, there's not enough of you for this blouse. I'll have to make this blouse out of this other fabric. You'll have to be this shell. The fabric said it didn't want to be that shell and, without thinking, I said "yes, you will". Now, I never would have talked to my children that way. I would hope that lightening would strike me if I ever said another child can have what one child wants, but he(she) can't. I would have tried to redirect the child's attention or talk about possible alternatives - just wouldn't have said "no way". How could I treat my beloved fabric this way? No wonder this fabric misbehaved. If you think that I am nuts, you are right. At the same time, I've never met (or read sewing blog or book) a sewer who I respected who didn't talk about what the fabric wants or, at least, the feel of a fabric for a particular pattern. As I was hemming this shell, I remembered that I had some orange fabric that would work beautifully for the sleeves. I could have added some trim or binding to tie in the color. There are always alternatives - I just didn't pay attention to what the fabric was saying. No wonder it misbehaved!!!
2. After making a pattern, write the corrections for next time on the instruction sheet - at the top and in red. The best thing to do is make the corrections before filing the pattern away, but that doesn't happen often for me. I made this pattern before. It fit nicely in a drapey rayon. I did have trouble with the facing fitting. I usually have to redraft the shoulders and armscye which means drawing new facing patterns. Last time I made it the facing didn't quite fit. I was able to deal with it all right because that fabric eased well. My medium weight cotton didn't ease at all - it just pulled and puckered. I found my note on a piece of paper that got stuck in one of the pattern pieces. (A lot of good that did!)
3. Never ASSUME that pattern pieces will fit together after making alterations (true for new patterns that aren't altered, too). Check them. If I had taken 5 minutes to check those facing pieces, I would have known that I had to redraft them.
4. When something is a mess, don't panic. Think of alternative solutions and how they will look on the garment. Sooo, what did I do about those pulling, puckering facings? They were drafted in one piece with the neckline and armscye in one piece. I simply cut them apart and had little, tiny facing. They were a struggle to get pressed and sewed down - even with topstitching. Certainly, the look is not very polished and professional. It would have taken less time to rip the facing off and sew binding at the neckline and armholes. I didn't have enough fabric to cut new facing but I did have enough to do binding which would have worked better on this top. Another alternative would have been to cut facings from another fabric. This blouse should have had binding from the beginning. I just didn't think. I was to busy fighting with the fabric (see #1).
Actually, the fabric is happier now that it met the orange pants. They are quite happy together. At least I learned a lot from this experience. I actually believe I will remember these lesson that I relearned the hard way.

Wednesday, June 17, 2009

The Sewing List

Marji wrote a post about how she loves lists. I do also. I make yearly lists, dailey lists, and sewing lists. I'm much more likely to get something done if it's on "the list". Yes, I do get many of the things I write on a list done. Since I tend to make ambitious lists (There is sooo much I want to do and so little time to do them.), I seldom cross everything off my list but the lists help a lot. At the beginning of this year, I gave a lot of thought to what I was doing with my sewing. There were two major problems:

1. I tried to do projects way beyond my sewing skills and became frustrated.
2. I had a lot of trouble staying focused on a project -probably related to #1.

My solution was to make a sewing list of no more than 15 projects that includes garments that either increase basic skills leading up to a tailored jacket or coat by the end of the year, decrease my wonderful stash, or add to basic wardrobe needs. Yea, I know....just about any garment can fall into one of those categories. That's o.k. - at least I know why it goes on the list. The probablity that it will be done is much higher. Every season I add 4 coordinated garments that are made from stash fabric. I'm also a mood sewer. One day I feel like sewing on red or another color. One day I'm ready to take on a fitting or sewing challenge and another day I just want to sew and see quick results. I wish that I could be more like others and start and finish a project before I start another. That seems more productive on the surface but doesn't work very well for me. So, my sewing list contains and focuses somewhat. I have to chose something from the list to sew depending on the mood of the day. While I would like to be more productive, the list has helped.

Here's my current sewing list:
1. Denim pull-on pants with jean topstitching - in preparation for making a "real" pair of jeans.
2. Black Pants - a wardrobe need.
3. Green Linen Jacket - Spring wardrobe and sewing an unlined jacket
4. Green Linen Skirt - Spring wardrobe and putting in an invisible zipper
5. Brown Silk pants - Spring wardrobe
6. Jeans muslin - hopefully wearable - from mid-range priced fabric in case it's terrible
7. Olive/Multi blouse - wardrobe need
8. Green Knit Top - wardrobe need and easy project
9. Purple Dress - wardrobe need and easy project
10. Red/white/Black Knit Dress - wardrobe need and easy project
11. White Dress - fitted and lined dress
12. Tailored jacket - lined jacket
13. Cardigan jacket - fit a new knit jacket and wardrobe need

That really is enough to keep me busy. I will add 4 co-ordinated summer garments soon. I won't list the other projects that keep spinning around in my head. After all, I do need to remain somewhat focused!

Wednesday, June 10, 2009

KS 3620

This KS 3620 blouse is really a wearable muslin. I've been working on this pattern, as a fitting excercise, for a while now. I will continue to work on it and probably will have a dozen of them made before I am excited about the fit. Before sewing this one, I did 3 muslins and thought that I had it right (lol). This example is View B which I made from 100% cotton from Timmel Fabrics (now out of business).
Here's a view of the back. I like the tie in the back although it doesn't show very well in the photo.

Now I'm working on a skirt, BWOf 08-2008 #121. I have the invisible zipper in (my first) and hope to finish the lining today.

Sunday, June 7, 2009

BWOF 02-2009 #118A

Here's my version of BWOf 02/09 #118. I made it from a mustard cotton jersey from Wazoodle. At this point, I'm not sure if I like it or not. For a knit top, it took way too much time to make. The Burda instructions for the sleeve were confusing to me and the fit is not to my liking. I'm not sure if I need to add more ease or if this pattern is better suited to a smaller busted woman. I do like the basic design and may try it again at some point.


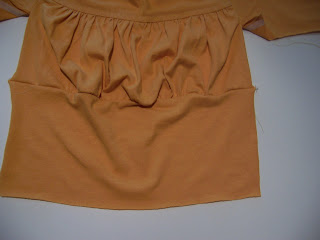
Definitely, the back needs a sway back adjustment here.

I never did figure out the Burda instructions and mainly used the tutorial by Dawn. I did finish the sleeve in different manner so that I could avoid "tunnel sewing". As Dawn pointed out, the most critical aspect is only sewing from notch #5 to notch #5 on the front and from notch #7 to notch #7 on the back. (You can see from the picture that I did some ripping. A bunch of lumps occur when sewing the seam at one time.)
View from the right side:
My next step was to sew from Notch 5 (Notch 7) to the end of the sleeve.
Then, I turned the inner sleeve to the inside, basted it to the shoulder seam, and topstitched.
Who needs to do puzzles to keep the mind working when there are pattern instructions to figure out? My greatest learning from this garment: I'll be sure that I can visualize the entire garment before putting it under the sewing machine. If I'm really confused like I was with this blouse, I always can sew a Mini Sample or stop be cocky and sew a muslin. I would have saved time with this project!

Friday, June 5, 2009

One Lovely Blog Award


Thanks, Gwen for awarding me the "Lovely Blog Award". The rules, as follows, are to pass it on to bloggers new to your list.

Rules: 1) Accept the award, post it on your blog together with the name of the person who has granted the award, and his or her blog link. 2) Pass the award on to 5 other blogs that you've newly discovered. Remember to contact the bloggeers to let them know they have been chosen for this award.

So, I pass this award to these recent additions to my blog list:

PendleStitches
JosieLoves2Sew
TwoOnTwoOff
AnotherCreation
Charlene'sSewingAdventure

BTW, I need some help getting awards on my sideboard. Obviously, I don't have any trouble with pictures, etc. on my blog. I copy the URL from "properties" and paste it on the blog. When I try to add the URL to the Picture Gadget, google says it is invalid. Yes, I checked it: It's the same URL that I added to the blog. Does anyone who uses google have a clue what I'm doing wrong? The other sewing bloggers don't seem to have a problem. (It is high time I did some housekeeping on my sidebar!) Thanks

Tuesday, June 2, 2009

May Didn't Bring Many Flowers

Here in Central Florida, there was no rain for weeks, but once it did start to rain it wouldn't stop. We lost lost half of our tomatoe crop and at least half (if not more) of the snap bean plants. We have some flowers - just not as many as usual this time of year. The view from my sewing room is nice, but not as awesome as the picture on this blog. Mother Nature is settled down a bit now. The temp is in the eighties with afternoon thunder storms.

My May sewing experience is about the same as the weather. The first of the month I just couldn't get going on any sewing. There was vacation catch-up, lots of fun times with family and friends, and a bunch of mini crises. Most of the time, I can work around those things. It just didn't happen the beginning of the month. I was a lot like most of the Fashion Show Contestants: the one who couldn't use a rotary cutter properly and the ones who pinned and glued garments together. Actually, I didn't use any glue (although I was tempted) and, certainly fixed the "messes" before wearing anything on my "fashion show runway"- the driveway. This was definitely a learning month once the sewing mojo kicked in (about the last week in May).When Burda says a design is easy to sew but more time consuming, forget the "easy" most of the time and remember the more time consuming. At any rate, I did finish two garments this month: BWOF 0209 #118A (a knit top) and KS 3620 (a woven blouse). The KS blouse as been in process for a while and was used as a fitting "experiment". I have the fit pretty close to the way I like it now with only a few tweaks for future sewing. Yep, that's it. I only completed two garments. I did cut out several garments that I'm excited about sewing. (That means I'll be doing a lot of sewing until I run into a problem!) I'll get pictures of the two garments and post about them later in the week.

My stash did increase this month. I blame the Fabric Mart Memorial Day Sale and Carolyn's post that showed some gorgeous yellow linen. Yes, I bought some yellow linen for a dress or jacket. A few other fabrics jumped into my shopping cart for a total of 10.25 yards. I only used 4 yards of fabric this month. Storage is becoming a definite problem. I sure hope the Sewing Problem Grinch stays away from my sewing room. I need garments and storage space!